💻 Seamless Multi-Cloud IaC with Pulumi: Swappable AWS and Azure Storage in C# 💻

By Gary Butler 15 min read
🚩 Introduction
Modern cloud engineering often demands flexibility.
What if you could switch your cloud backend; AWS or Azure; without rewriting a single line of code? With Pulumi and C#, you can.This blog explores leveraging interfaces and components for truly swappable, cloud-agnostic infrastructure.
Let’s dive in.
💻 Infrastructure as Code
Infrastructure as Code (IaC) is a key practice in modern cloud engineering, allowing you to manage and provision cloud resources through code. This approach brings several benefits:
- Version Control: Just like application code, your infrastructure code can be versioned, enabling better collaboration and change tracking.
- Automation: IaC enables automated provisioning and management of infrastructure, reducing manual errors and increasing efficiency.
- Consistency: By defining infrastructure in code, you ensure consistent environments across development, testing, and production.
🧰 What is Pulumi?
Pulumi was created in 2018 to make infrastructure automation more developer-friendly and flexible than the older tools like Terraform, CloudFormation, or Azure Resource Manager. While those platforms use their own domain-specific languages or JSON/YAML templates, Pulumi lets you write infrastructure using real programming languages like JavaScript, TypeScript, Python, Go, and .NET languages (C#, F#). This means you can use loops, functions, libraries, and testing just as you do in application code. Pulumi also makes it simple to work across different clouds in the same project; something that’s much harder to achieve with traditional IaC tools. Overall, Pulumi aims to bring the speed and power of modern software development to infrastructure management.
💡 Why C# with Pulumi for Multi-Cloud?
Choosing C# for Pulumi in multi-cloud IaC brings .NET teams distinct productivity gains thanks to the language’s unique ecosystem and features:
- Deep integration with Visual Studio, Rider, and other .NET tooling for a seamless developer experience.
- Access to the .NET library ecosystem and NuGet packages.
- The C# compiler helps catch mistakes early with strong typing, so random runtime errors are less likely.
- C# features like LINQ, async/await, pattern matching, and generics.
- Ability to reuse existing .NET code, libraries, and business logic within Pulumi projects.
- Testing your IaC can be done with .NET unit testing tools (xUnit, NUnit, MSTest).
- Refactoring, auto-complete, and code navigation work exactly as you expect in your IDE; so infrastructure work feels just as smooth as writing business logic.
🗄️ Creating a Multi-Cloud Storage Component
A multi-cloud storage component lets you work with storage in different cloud providers (like AWS or Azure) using a single, unified approach in your code. The goal is to make your app or infrastructure flexible, so you can swap between clouds without major code changes.
In AWS, this means using an S3 bucket for object storage. In Azure, you’d use a Blob Storage container for the same job. Your Pulumi code defines a storage resource in a cloud-agnostic way, without needing to know in advance which provider you’ll use. Later, the actual storage type (S3 vs. Blob) is decided by configuration or deployment settings. This approach allows you to write once, then deploy to whichever cloud fits your needs, without reworking your architecture.
Step 1: 📐 Define the Common Interface
A storage abstraction, so your application can depend on “just storage”, not a specific cloud:
using Pulumi;

public interface IStorageModule
{
  Output<string> Endpoint { get; }
}
Output<T> in Pulumi represents a value that’s only available after a resource is created; like a URL or connection string; so your code can safely use it once deployment is done.
Step 2: 🟧 Create the AWS S3 Implementation
Encapsulate AWS S3 as a component that matches your interface:
using Pulumi;
using Pulumi.Aws.S3;

public class AwsStorageModule : ComponentResource, IStorageModule
{
    public Output<string> Endpoint { get; }

    public AwsStorageModule(string name, ComponentResourceOptions? opts = null)
        : base("multi:cloud:AwsStorageModule", name, opts)
    {
        var bucket = new Bucket(
            name,
            new BucketArgs(),
            new CustomResourceOptions { Parent = this });

        Endpoint = Output.Format($"https://s3.amazonaws.com/{bucket.Id}/");

        RegisterOutputs(new Dictionary<string, object?> { ["endpoint"] = Endpoint });
    }
}
RegisterOutputs does two important things:
- It lets Pulumi know that when this component is done deploying, it should make the Endpoint property (the S3 bucket’s URL) available outside the component for use by other resources or stacks.
- It helps Pulumi track dependencies and know when your component is fully provisioned, improving resource graph accuracy and output visibility.
Step 3: 🟦 Create the Azure Blob Storage Implementation
Mirror the interface in Azure:
using Pulumi;
using Pulumi.AzureNative.Resources;
using Pulumi.AzureNative.Storage;
using Pulumi.AzureNative.Storage.Inputs;

public class AzureStorageModule : ComponentResource, IStorageModule
{
    public Output<string> Endpoint { get; }

    public AzureStorageModule(string name, ComponentResourceOptions? opts = null)
        : base("multi:cloud:AzureStorageModule", name, opts)
    {
        var resourceGroup = new ResourceGroup(
            $"{name}-rg",
            new ResourceGroupArgs(),
            new CustomResourceOptions { Parent = this });

        var storageAccountArgs = new StorageAccountArgs
        {
            ResourceGroupName = resourceGroup.Name,
            Sku = new SkuArgs { Name = SkuName.Standard_LRS },
            Kind = Kind.StorageV2,
        };

        var storageAccount = new StorageAccount(
            name.ToLower(),
            storageAccountArgs,
            new CustomResourceOptions { Parent = this });

        Endpoint = Output.Format(
            $"https://{storageAccount.Name}.blob.core.windows.net/");

        RegisterOutputs(new Dictionary<string, object?> { ["endpoint"] = Endpoint });
    }
}
Step 4: 🏭 Build a Cloud-Agnostic Factory
Implement a factory that creates the right storage component based on Pulumi configuration:
using Pulumi;

public static class ProviderHelper
{
    public static CloudProvider GetProvider(Config config)
    {
        var value = config.Require("provider");
        if (Enum.TryParse<CloudProvider>(value, true, out var provider))
        {
            return provider;
        }

        throw new ArgumentException($"Unknown provider type: {value}");
    }
}

public static class StorageFactory
{
    public static IStorageModule Create(string name)
    {
        var config = new Config();
        var provider = ProviderHelper.GetProvider(config);

        return provider switch
        {
            CloudProvider.Aws => new AwsStorageModule(name),
            CloudProvider.Azure => new AzureStorageModule(name),
            _ => throw new NotSupportedException(
                    $"Provider '{provider}' not supported")
        };
    }
}
The Config object in Pulumi C# is used to access configuration values for your stack; like the chosen cloud provider (AWS or Azure). When you write new Config(), Pulumi loads settings from your stack’s YAML config file, typically called Pulumi.<stack-name>.yaml (for example, Pulumi.dev.yaml).
config:
    aws:region: ap-southeast-2
    iac-multi-cloud:provider: azure
Step 5: 🧩 Consume the Abstraction in Your Stack
This is all the main stack needs to do:
using Pulumi;
public class MultiCloudStack : Stack
{
public MultiCloudStack()
{
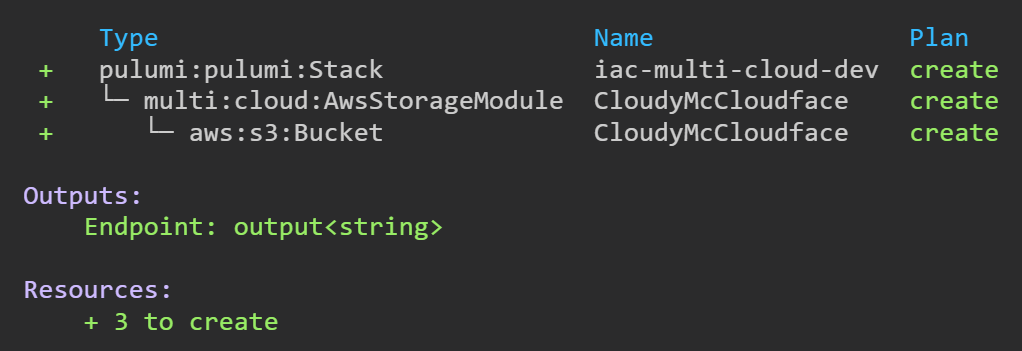
var storage = StorageFactory.Create("CloudyMcCloudface");
Endpoint = storage.Endpoint;
}
[Output]
public Output<string> Endpoint { get; set; }
}
This sets up whichever storage service (AWS S3 or Azure Blob) is chosen in your Pulumi config. The endpoint (e.g., your storage URL) gets exposed as a stack output so you can easily see or use it after deployment.
Step 6: ▶️ Running the Stack via Program.cs
The Pulumi entry point in Program.cs shows how your stack actually gets launched:
using Pulumi;

return await Deployment.RunAsync<MultiCloudStack>();
When you run pulumi up, Pulumi starts here, creates your stack (MultiCloudStack), and handles the rest.
Step 7: 🔄 How to Switch Clouds
Cloud choice happens at runtime, not design time:
pulumi config set provider aws
or
pulumi config set provider azure
The stack automatically provisions the right resources for the selected cloud when you next call pulumi up.

No code changes, just config! Redeploy and your cloud resources will be swapped underneath.
🌐 Why This Pattern Is Powerful
- No Code Repetition (DRY): No duplication, just one interface and many implementations.
- Maintainability: Cleanly extend to add Google Cloud or others, or more resource types (queue, compute, API Gateway, etc.)
- One deployment pipeline: CI/CD and your team workflow don’t care which cloud is chosen.
- Cloud migration becomes easy: Changing platforms is as simple as updating a config variable.
🎯 Wrapping Up
With Pulumi and C#, multi-cloud abstraction isn’t just theory; it’s practical, maintainable, and tested in real-world environments. If your organization values portability, future-proofing, or DRY DevOps, this pattern unlocks a whole new level of control.
Looking for more? Extend these patterns for your own API Gateways, serverless compute, or composite microservice patterns; one interface at a time.